
In 2020 I started designing cookie cutters.
I made a ton of Christmas designs, and one of those was a Christmas tree barn shape that was an instant hit. For my local presale, I received so many orders for sets including that shaped cookie, it was almost more than I could handle.
Every time I looked at that cookie, I thought, man that would make a cool full size gingerbread house. And at the end of 2022, I finally made it!


First two images are from 2020 (with my old logo). The middle picture is the set I sold like 50 of that year - it was crazy. The third picture is from 2021. I received an order for "classy" Christmas cookies and I jumped at the opportunity. This cookie was also the inspiration for the 3D house I made around new years eve of 2022.
If you want to make this gingerbread house too, you can download the PDF with the outlines here for free! And if you want to watch the video process you can find that below. But keep scrolling for the full written walkthrough!

You will need:
A construction gingerbread recipe. I used this one from Haniela.
The schematics for the house. Print and cut out the shapes for the walls. Everything fits on regular paper, so you won't have to cut and tape any sheets together.
A batch of royal icing. You can find my recipe here. For this project, I omitted the glucose and corn syrup.
Parchment paper and plastic wrap.
Gelatin sheets. I bought mine here.
Scribe, paintbrush, scissors, and piping bags, etc.
String lights (optional- but they certainly make this project magical!). Here's some similar to mine, although I bought mine from my local Aldi.
A heavy object, like a can from the pantry.
A decorated cookie to put inside (optional).

Here's the shapes that make up the house.
When I make my dough I roll it out in between sheets of plastic wrap, and chill them in the freezer for anywhere from 2-24 hours.
When I am ready to cut and bake my shapes, I transfer the dough to parchment paper, then lay the cutout directly onto the dough. I used a pairing knife to cut out the shape, and just removed the outer dough. I cut out the windows, but I didn't remove them until after it was baked to keep them from spreading in the oven. The windows have to be removed while the dough is still warm.


My favorite part of this house is the "stonework." Everywhere that I wanted stone, I first spread thick white icing flat on the cookie. I used a food safe marker to make sure it was at the same height on all the walls of the barn. On the side building, I covered the entire walls in this stone detail. I added a door on the side building's front wall.


I outlined the stone shapes across each shape, then flooded them all in.


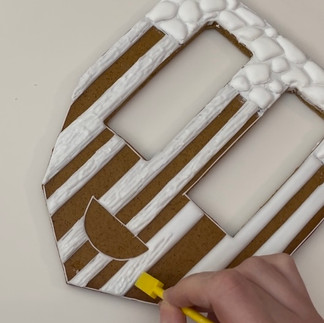
For the wood details, I added vertical lines, at varying widths. I flooded in every other line and let them crust. Then I came back and "crunched" the crusted sections. This is a good time to point out that I added a half circle detail on the front barn wall.


On each piece with the wood detail, I flooded the empty spaces, let them crust, then crunched them just like before. I let all of these pieces dry completely.


After the stone was completely dried, I piped icing between the rocks and spread it around with a paint brush. This really cemented the rock look. Get it? Cemented! Haha... anyhow.


I added details to the door, and the half circle design on the front of the barn.


For the windows I used gelatin sheets. I just cut them to the right size and stuck them to the back with royal icing.
Using black icing, I added lines on the back of each window.


I took all the dough I had left and baked a large slab to act as a base for the house. Using very thick icing, I built the house, with the help of a can of green beans. I also piped icing along each seam, and spread it smooth with a paint brush.


I added a decorated tree cookie by attaching a candy cane cookie to the back for support. If you notice, I piped tan icing on the floor of the main barn and I 100% regretted doing this, but couldnt undo it. I added fairy lights to the house by placing the main battery pack in the smaller room next to the wall. You could leave it outside the house if you wanted, but I wanted it all encased for a full 360 degree experience. I put a portion of the lights in the smaller room, then fed the other half of them to the main barn section. I then attached the roof pieces. Mini cookies came in handy to keep the roof from sliding off.


Once the roof was on, I piped black icing in between each section, and then on the tops as well. I used a paint brush to stipple the roof for texture. I also painted the edges of the roof pieces black.


And that's it. You too can have a gingerbread house that you can't turn off. That is, if you glue your battery pack inside with icing like I did :D


Commentaires