
I am so excited to share these cookies with you!
I originally designed and shared them around valentines day, but I think they are perfect for anytime!
I like to imagine the space these pieces would call home. Cozy, lots of light, a neat and tidy desk... lots of plants... sigh.
If you want to make these cookies too, here are some resources to get you started:
Royal Icing Recipe:
Royal Icing Tips and Tricks:
Hand Cutting Templates - if you want to use the same shapes I did:
Etsy shop for our STL files:
Youtube video for these cookies (scroll down for full written tutorial).
Let's talk icing:

I made A LOT of colors for this set. You do not have to make all these colors to have lovely cookies, I just really enjoy mixing colors.
For the following colors, I mixed an outline and a flood for each. Here's how I got each color:
Light pink- A small amount of bakers rose, and a teensy bit of brown (see my coloring guide for more info on how to achieve this).
Dark pink- A bit more bakers rose than the above icing, and a little more brown.
Light brown- brown gel color, plus a teensy bit of yellow.
Dark brown- more brown than before, plus a teensy bit of yellow.
The cooler, blueish green- a mix of leaf green, forest green, and a pinch of turquoise.
The warm, darker green- leaf green plus golden yellow.
For the white icing I made an outline and flood, but the outline is slightly thicker than usual. This is because we will be using it for our macrame hanging.
For the lightest green I only made a flood consistency. To achieve the color, I started by making light yellow and added a teensy bit of green.
You will also need a tiny bit of black outline icing, although it is not shown in the picture.

To prepare your bags, clip the ends of the bags very small. About 1-2 mm wide. Remember you can always make the hole bigger, but you can't make it any smaller. Notice I am using tipless bags.
Please note that the numbers on the bottom of the ruler are centimeters, and the little lines are millimeters. We want the bags cut about 1-2 MILLIMETERS not centimeters.
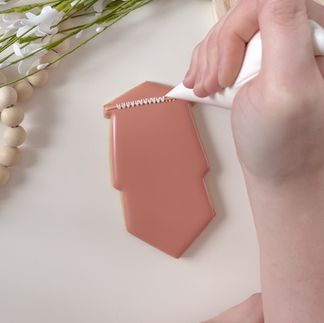
Macrame Cookie
Using the dark pink outline consistency, choose a spot on the edge of the cookie to touch down. Using steady pressure, lift the bag about a half inch from the surface and lay the icing down like a string. Don't drag the bag along the cookie. Letting the outline fall like a string will give you control, and smooth, steady lines. Flood with the dark pink flood icing.


When flooding, be sure to add the icing carefully, laying down one line next to the last line of icing. This will give you a smooth surface, and help avoid air bubbles.
Set this cookie aside to crust for about an hour.
Using the light brown outline icing, make a line along the upper part of the cookie (where the top of the hanging would be - see photo). To help visualize where the "yarn" will be, you can add white dots with outline consistency along the underside of the brown line. I made 14 dots, but just make sure you have an even number. Add "V" shapes with the white outline icing over the brown line. These are the knots where the macrame hanging connects to the pole. Make sure the bottom of the "V" touches the dots you made previously. Then create little loops under each V shape. These don't have to be perfect or even exactly like mine. You just want to give the feel that it is made of yarn and knots.


You can make loops that connect to each other, giving you 7 points from the original 14.
Using the light brown outline consistency, you can add little drops of brown to look like beads at the bottom of these V shapes. You can go back with the white outline and add little dots to look like knots. Add a longer V shape on either side of the original 14. Add brown "beads" at the end of these as well. For all these details you will use outline consistency of each color.


Continue adding loops, lines, and beads as you make your way down the cookie. I added long strands in white on either side of the main body of the macrame hanging.


You can stop adding details about 1/3 to 1/2 of the way down, and just add long strings.


Making the strings have slight variations helps it look more realistic. Macrame hangings aren't perfectly straight.
Pillows Cookie
I love this shape more than I should, haha! I like to add it to any set from Autumn/ Halloween, to Christmas, to Valentine's Day. And I have!


To begin, using the outline consistencies of each, outline the front left pillow in light pink, the front right pillow in dark pink, and the furthest back pillow in dark brown. Flood the back pillow in dark brown. Let this crust for 15-20 minutes. Once the back pillow has crusted, flood the pillow to the right in dark pink, and set aside to crust again.


After the first two pillows have dried or crusted, flood in the front pillow with light pink. Immediately add blobs of dark pink, as shown. Then immediately add squiggles of dark brown as shown. Add both of these while the light pink is still wet. That way it will all dry together as one layer.


Let that front pillow crust before moving on, and make sure the back dark brown pillow is firmly dried.
Squeeze a little bit of dark brown flood icing onto the surface of the back pillow. Use a paint brush to stipple the surface so it looks like a fuzzy pillow. Then, using the dark pink outline icing, add a border to the front right pillow. I do this with a slight up and down motion and steady pressure.


Finish the border around the dark pink pillow. Then, using the dark pink outline icing, add little dot details, as shown.


Next up is the monstera cookie. Start by outlining and flooding the base in light pink. Let this crust for about an hour before moving forward.


Next, outline the shape of the pot in white. Then flood with the flood icing. Using the cooler green outline icing, add 3 plant stems.


Next, outline the top leaf of the plant as shown. Make sure to add a line down the center of the leaf, and some holes too. Flood one side of the leaf. Add two more leaves the same way. Let these crust.


Flood the other halves of the leaves. I love the subtle dimension this simple trick adds.
Using the white outline icing, add some designs to the plant pot. You can copy mine, or do your own. Simple polka dots or stripes would look good too! Take a small piece of parchment paper, and lay it on these piped details so they will dry with a flat surface.


Make sure the icing details under the parchment is completely dried (1-2 hours) before removing the paper. Remove the paper, and add a fourth leaf in the front. Flood one side, let crust for 10-15 minutes, then flood the other side.


Next is the hanging pothos cookie. Start by outlining with the white outline icing, and then flooding with the white flood consistency. Let this crust for an hour or so.


Outline the plant pot with the dark pink outline icing. Flood with the dark pink flood, then add two lines with the light pink flood.


Add 4 of the leaf outlines in the dark warm green as shown, complete with a line down the center. Flood one side of each leaf, but add a dot of the light yellow/ green and use your scribe to swoosh the color in. If you love pothos like I do, you know that some of them have these light green swirls in their leaves. Let these crust for 10 or so minutes before flooding the other sides of the leaves.


Flood the other sides of the leaves, adding light green in the center. Using the green outline consistency, add lines coming from the pot to the leaves. You can also add the string for hanging the plant pot in black (or whatever color you choose).


Make sure that the pink pot has firmly crusted before moving to this next step. We're going to add four more leaves. Flood one side, adding the light green swirls. Let them crust for minutes, then flood the other sides of these leaves. And you're done!


Our Final Potted Plant Cookie
Start by outlining the cookie in light brown outline consistency, then flood with the light brown flood. Let this layer crust for 15-30 minutes, then outline and flood the shape of the pot with the dark brown outline and flood respectively.


Use the blue green outline to make some branches. Then add leaf shapes all over those stems.


Flood in each leaf. If you piped them so they do not touch, you can flood them all at the same time. Let them crust for a few minutes, then using the outline consistency, add a line down the center of each leaf.


Let your cookies dry, then find an open window, some cookie props, and take some photos of your little edible art pieces.


As always, let me know if you make them, and thanks for talking cookies with me!
-Savannah
Comments